Learning how to read welding symbols is crucial to welding projects. Understanding the parts of a welding symbol and what they mean can help you create joints successfully and efficiently. Welding symbols can range from straightforward to complex, depending on the type of weld.
Understanding welding symbols takes time, and many welders use cheat sheets for assistance as they gain experience. If you’re new to welding or just need a refresher, read on to learn the basics of reading welding symbols.
Welding symbols are a way to visually convey information to the welder about a welding joint. Engineers include welding symbols on welding blueprints to note the type, size and location of the weld, plus other supplementary information.
The primary purpose of welding symbols is to provide the welder with information on where to weld, the joint type, how much metal or filler material to use, and how much of that material to apply in or on the joint. The American Welding Society is responsible for creating the symbol standards.
Specifying welds with standardized symbols instead of pictures and text streamlines the welding process, as engineers don’t have to spend time explaining the weld, and welders don’t have to spend time reading instructions. For this reason, most engineering drawings for welding jobs incorporate welding symbols to denote pertinent information associated with a weld.
While you may hear the terms “welding symbol” and “weld symbol” used interchangeably, the two are distinct.
The welding symbol is an overall representation of what’s required to produce a welded joint. Weld symbols are graphic characters connected to the reference line of a welding symbol that specify the weld type. In essence, weld symbols are one element of welding symbols.

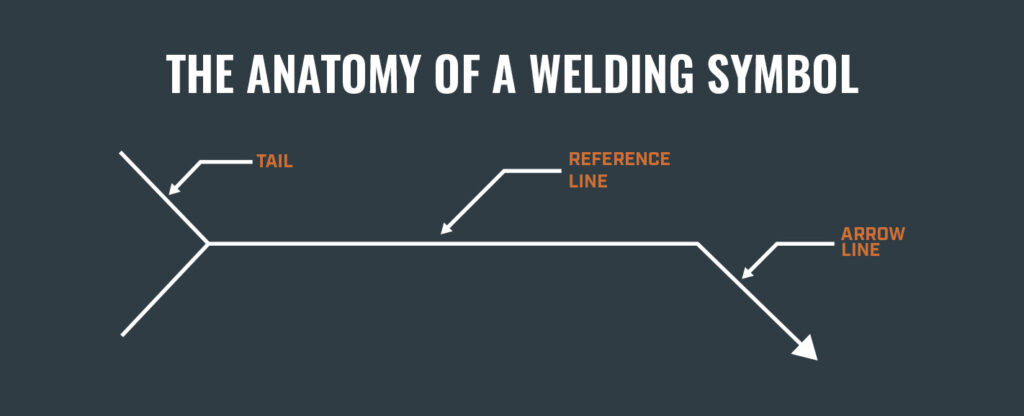
You’ll find three main components in every welding symbol, regardless of the type of weld — the reference line, arrow and tail.
The reference line is a horizontal line that forms the body of the welding symbol. This line serves as an anchor for the rest of the information, with shapes, numbers and letters positioned in specific locations on or around it. Essentially, the instructions for creating a weld are strung along the reference line.
The arrow connects the reference line to the joint in which the weld is to be made. The arrow can point in any direction — left, right, up, down or toward the tail. Some welding symbols contain multiple arrows.
Many times, the arrow points to a joint that has two sides, meaning there are two potential places to weld. For example, when linking two metal pieces to form a T-shape, welding may be done on each side of the T’s stem.
The welding symbol differentiates between each joint side using the arrow and the spaces above or below the reference line to indicate a weld on the following:
The tail is a sideways “V” attached to the reference line on the opposite side of the arrow. The tail provides supplementary information, such as which welding or cutting process to use and general notes or specifications that apply to the joint.
Welding drawings use dimensions to specify the weld’s length, width, depth and opening.
You’ll find the weld’s width or diameter expressed in inches on the weld symbol’s left side and its length on the weld symbol’s right side. Say, for example, a blueprint instructs you to perform a weld that’s a 1/2 inch wide and 4 inches long. These instructions will appear as “1/2” followed by the weld symbol and the number “4.”
If the project requires welding on each side of a joint, you’ll see a symbol on each side of the reference line. Note where these symbols are on the line — if they align and are on the same side of the reference line, the welds should do the same. Alternatively, if the symbols are offset, the welds should also be offset.
It’s important to take note of the numbers beside the symbols. While a joint may need welding on each side, the length and width may differ. Remember that figures under the reference line designate what to do on the side of the joint to which the arrow points. Figures above the reference line designate what to do on the other side of the joint.
Finally, some welding blueprints may contain a flag shape at the junction of the reference line and the arrow. A flag stipulates that you should complete the final welding procedure in the field rather than in the shop.
In addition to lines, shapes and numbers, you’ll find various letters on a welding blueprint. These letters specify pertinent information like the weld bead’s length or the root opening.
If you’re new to reading welding symbols, it can be helpful to keep a copy of letter meanings handy as you perform welds. Here is a brief list of welding symbol letter meanings:
PBZ Manufacturing is a full-service metal manufacturer that offers one-stop-shop capabilities in engineering, manufacturing, finishing, assembling and shipping.
Contract manufacturers and OEMs throughout the Northeast Atlantic region choose PBZ because our comprehensive services remove excess layers from their supply chains, reducing project completion timelines, lowering manufacturing costs and simplifying material handling and logistics.
We’re proud to offer the experienced engineers, certified welders, cutting-edge equipment and ingenuity required to do your job right. Contact PBZ Manufacturing today and put our resourcefulness to work for you.